Cisco IOS as a CA, DNS & HTTPS Server Lab Objective
In this lab you will configure a single Cisco IOS router to simultaneously act as a:
● Root Certificate Authority (CA) — issue X.509 certificates via SCEP
● DNS Server — resolve internal hostnames and forward unknown queries to 8.8.8.8
● HTTPS Web Server — serve the IOS management page over TLS using a CA-signed certificate
A second router (R-CA-CLIENT-WEB) acts as the HTTPS web-server endpoint and certificate client. A Linux/Windows PC validates the full end-to-end flow by browsing to websrv.n2s.in over HTTPS.
1. Theory & Background 1.1 Public Key Infrastructure (PKI) — How It Works
PKI is a framework for managing digital certificates that bind a public key to an identity. The trust chain flows from a Root CA downward to end-entity (identity) certificates:
● Root CA — the trust anchor. Its certificate is self-signed and must be explicitly trusted by all clients.
● CSR (Certificate Signing Request) — a PKCS#10 message generated by a client containing its public key and identity attributes.
● SCEP (Simple Certificate Enrollment Protocol) — a Cisco-standard HTTP-based protocol that automates CA authentication and certificate enrollment on IOS.
● Trustpoint — an IOS container that stores CA certificates, identity certificates, and enrollment parameters.
1.2 IOS DNS Server
IOS can act as a caching and authoritative DNS resolver using static host entries (ip host) combined with an upstream forwarder (ip name-server). This allows internal clients to resolve both internal names (answered locally) and internet names (forwarded upstream).
1.3 IOS HTTPS Server (ip http secure-server)
IOS includes a built-in HTTP/HTTPS server used for device management and SCEP enrollment. Binding a PKI trustpoint to the HTTPS server replaces the default self-signed certificate with a CA-issued one, enabling full certificate chain validation in browsers.
⚠️ CRITICAL — Time Synchronisation All PKI operations are time-sensitive. Certificate validity periods (notBefore / notAfter) are checked on every use. A clock skew of even a few minutes between the CA and clients can cause:
• Enrollment failures (certificate not yet valid)
• TLS handshake failures (certificate expired / not yet valid)
• ISAKMP/IKE failures when using certs for VPN
Best practice: Configure NTP on all devices before generating any certificates.
2. Lab Topology
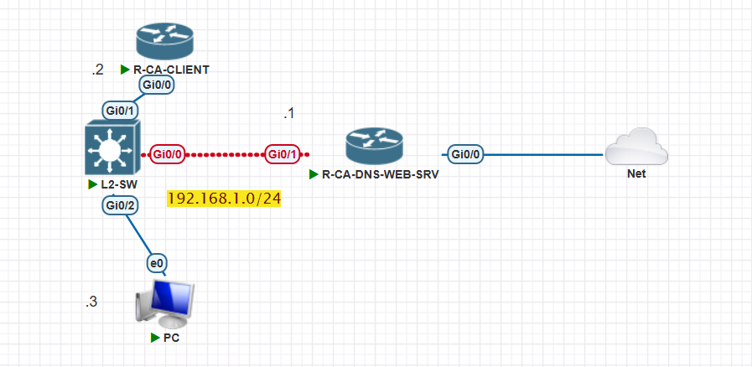
| Device | Role | Interface | IP Address |
| R-CA-DNS-WEB-SRV | CA + DNS Server | Gi0/0, Gi0/1 | 192.168.1.1 |
| R-CA-CLIENT-WEB | Cert Client + HTTPS Web Server | Gi0/0 | 192.168.1.2 |
| PC | End-user browser | E0 | 192.168.1.3 |
All devices share the 192.168.1.0/24 subnet. R-CA-DNS-WEB-SRV at .1 is reachable by all clients for DNS (UDP/53), SCEP (TCP/80), and HTTPS management. R-CA-CLIENT-WEB at .2 hosts the HTTPS web server that the PC browses to.
3. CA Server Configuration
3.1 Configure the Root CA on R-CA-DNS-WEB-SRV
The IOS CA server stores a self-signed Root CA certificate in NVRAM and serves SCEP requests over HTTP. ip http server must be enabled BEFORE starting the CA.
R-CA-DNS-WEB-SRV(config)# ip http server //Enables the HTTP Server for CA SCEP Enrollment
! Required — CA uses HTTP (TCP 80) for SCEP enrollment requests

R-CA-DNS-WEB-SRV(config)# crypto pki server CA-SRV //Creates a CA server named CA-SRV
R-CA-DNS-WEB-SRV(cs-server)# issuer-name CN=N2S-CA,OU=IT,O=N2S,C=IN //You can define ROOT CA Attributes as per your requirement
R-CA-DNS-WEB-SRV(cs-server)# grant auto //Grant signed CA certificate automatically to clients who requests it provided they give the correct password

R-CA-DNS-WEB-SRV(cs-server)#
*Jun 14 09:31:17.254: %PKI-6-CS_GRANT_AUTO: All enrollment requests will be automatically granted.


R-CA-DNS-WEB-SRV(cs-server)# lifetime certificate 365 //Certificate lifetime can be as per your requirement

R-CA-DNS-WEB-SRV(cs-server)# no shutdown //Turn UP the CA Server you have to define the password and use it on CA client for while requesting signed identity certificate from CA
! IOS prompts for a passphrase to protect the CA private key — choose a strong one

%Some server settings cannot be changed after CA certificate generation.
% Please enter a passphrase to protect the private key
% or type Return to exit
Password:

Re-enter password:
% Generating 1024 bit RSA keys, keys will be non-exportable...
[OK] (elapsed time was 1 seconds)

*Jun 14 09:32:00.839: %SSH-5-ENABLED: SSH 1.99 has been enabled
% Certificate Server enabled.
| Command | Purpose |
| ip http server | Enables the HTTP listener required for SCEP (TCP 80). Without this, client enrollment fails. |
| crypto pki server CA-SRV | Creates the IOS CA server named CA-SRV. Enters cs-server sub-mode. |
| issuer-name CN=… | Sets the Subject Distinguished Name of the Root CA certificate (X.509 fields). |
| grant auto | Automatically approves all PKCS#10 enrollment requests. Use 'grant none' in production — approve manually with 'crypto pki server CA-SRV grant all'. |
| lifetime certificate | Validity of identity certificates issued to clients in days. Default is 1 year. |
| no shutdown | Starts the CA service. Prompts for passphrase. Generates RSA key pair (default 1024 bit — increase to 2048 for security). |
💡 RSA Key Size The default IOS CA key is 1024 bits — considered weak by modern standards.
To use 2048-bit keys, pre-generate the key pair BEFORE creating the CA server:
R-CA-DNS-WEB-SRV(config)# crypto key generate rsa general-keys label CA-SRV modulus 2048
R-CA-DNS-WEB-SRV(config)# crypto pki server CA-SRV
IOS will use the existing key pair instead of generating a new one.
3.2 Verify the Root CA Certificate
R-CA-DNS-WEB-SRV#show crypto pki certificates
CA Certificate
  Status: Available
  Certificate Serial Number (hex): 01
  Certificate Usage: Signature
  Issuer:
    cn=N2S-CA
    ou=IT
    o=N2S
    c=IN
  Subject:
    cn=N2S-CA
    ou=IT
    o=N2S
    c=IN
  Validity Date:
    start date: 09:32:02 UTC Jun 14 2026
    end   date: 09:32:02 UTC Jun 13 2029
  Associated Trustpoints: CA-SRV
4. Certificate Enrollment — Client Router 4.1 Configure Trustpoint on R-CA-CLIENT-WEB
A trustpoint is an IOS container that holds PKI credentials. Configuring a trustpoint here tells the client where the CA is (SCEP URL), what identity to request (subject-name), and which RSA key pair to use.
R-CA-CLIENT(config)# crypto pki trustpoint CA-SRV
R-CA-CLIENT(ca-trustpoint)# enrollment url http://192.168.1.1
! Points to the SCEP endpoint on the CA server (TCP 80)
R-CA-CLIENT(ca-trustpoint)# subject-name CN=R-CA-CLIENT,OU=IT,O=N2S,C=IN
! Subject DN that will appear in the issued identity certificate
R-CA-CLIENT(ca-trustpoint)# revocation-check none
! Skips CRL / OCSP check — acceptable in lab; use 'crl' or 'ocsp' in production
R-CA-CLIENT(ca-trustpoint)# rsakeypair CA-SRV
! Links a named RSA key pair to this trustpoint (auto-generated if absent)
R-CA-CLIENT(ca-trustpoint)# exit
4.2 Authenticate the CA (Install Root CA Cert) This step downloads the Root CA certificate from the CA server via SCEP and installs it into the trustpoint. The fingerprint shown should be verified out-of-band against the CA server's output.
R-CA-CLIENT(config)# crypto pki authenticate CA-SRV
Certificate has the following attributes:
   Fingerprint MD5:  72879A10 2945C94E 6FA27373 1349B747
   Fingerprint SHA1: CE04C1EC BFEE71FB 2283501F 9F86FBAE 96681D5F
% Do you accept this certificate? [yes/no]: yes
Trustpoint CA certificate accepted.

! Verify the fingerprint against: R-CA-DNS-WEB-SRV# show crypto pki server CA-SRV
4.3 Enroll — Generate and Send the CSR
R-CA-CLIENT(config)# crypto pki enroll CA-SRV
% Start certificate enrollment ..
% Create a challenge password (used if you need to revoke this cert later):
Password: **********
Re-enter password: **********
% The subject name in the certificate will include: CN=R-CA-CLIENT,OU=IT,O=N2S,C=IN
% Include the router serial number in the subject name? [yes/no]: no
% Include an IP address in the subject name? [no]: no
Request certificate from CA? [yes/no]: yes
% Certificate request sent to Certificate Authority

*Jun 14 10:03:05.895: %PKI-6-CERTRET: Certificate received from Certificate Authority
4.4 Verify the Enrolled Certificate
R-CA-CLIENT#show crypto pki certificates
Certificate
  Status: Available
  Certificate Serial Number (hex): 02
  Certificate Usage: General Purpose
  Issuer:
    cn=N2S-CA
    ou=IT
    o=N2S
    c=IN
  Subject:
    Name: R-CA-CLIENT
    hostname=R-CA-CLIENT
    cn=R-CA-CLEINT
    ou=IT
    o=N2S
    c=IN
  Validity Date:
    start date: 10:01:31 UTC Jun 14 2026
    end   date: 10:01:31 UTC Jun 14 2027
  Associated Trustpoints: CA-SRV

CA Certificate
  Status: Available
  Certificate Serial Number (hex): 01
  Certificate Usage: Signature
  Issuer:
    cn=N2S-CA
    ou=IT
    o=N2S
    c=IN
  Subject:
    cn=N2S-CA
    ou=IT
    o=N2S
    c=IN
  Validity Date:
    start date: 09:32:02 UTC Jun 14 2026
    end   date: 09:32:02 UTC Jun 13 2029
  Associated Trustpoints: CA-SRV

We have both our Signed certificate and ROOT CA cert.
💡 What to Look For Two certificates should appear under 'show crypto pki certificates':
1. Certificate (serial 02) — your device's identity certificate, signed by the CA
2. CA Certificate (serial 01) — the Root CA certificate (self-signed)
If you only see the CA cert, enrollment failed — check SCEP reachability (ping 192.168.1.1, then try manually browsing http://192.168.1.1/certsrv/mscep/mscep.dll).
5. DNS Server Configuration 5.1 Enable DNS Service and Configure Records
R-CA-DNS-WEB-SRV(config)# ip dns server
! Enables IOS to answer DNS queries from clients

R-CA-DNS-WEB-SRV(config)# ip host websrv.n2s.in 192.168.1.2
! Static A record: websrv.n2s.in → 192.168.1.2 (the HTTPS web server router)

R-CA-DNS-WEB-SRV(config)# ip name-server 8.8.8.8
! Forwarder: unknown queries are proxied to Google DNS

R-CA-DNS-WEB-SRV(config)# ip domain lookup
! Ensures DNS lookup is active (enabled by default, include if previously disabled)
| Command | Purpose |
| ip dns server | Starts the IOS DNS server process — listens on UDP/TCP 53. |
| ip host <name> <ip> | Creates a static host entry (equivalent of an A record). Multiple IPs can be listed for round-robin. |
| ip name-server 8.8.8.8 | Sets the upstream forwarder. Unknown queries are proxied here. Up to 6 name-servers can be configured. |
| ip domain lookup | Enables DNS name resolution (default: on). Use 'no ip domain-lookup' on lab routers to stop spurious DNS lookups for mistyped commands. |
5.2 DNS Forwarding Logic
Client query for 'websrv.n2s.in'
         │
         ▼
  IOS DNS Server (192.168.1.1)
         │
         ├── Check: ip host table
         │       websrv.n2s.in → 192.168.1.2  ✔  Return to client immediately
         │
         └── Not found in ip host?
                  │
                  ▼
           Forward to 8.8.8.8 (Google DNS)
                  │
                  ▼
           Cache response + return to client
5.3 Verify DNS Our internal client PC has 192.168.1.1 as DNS server

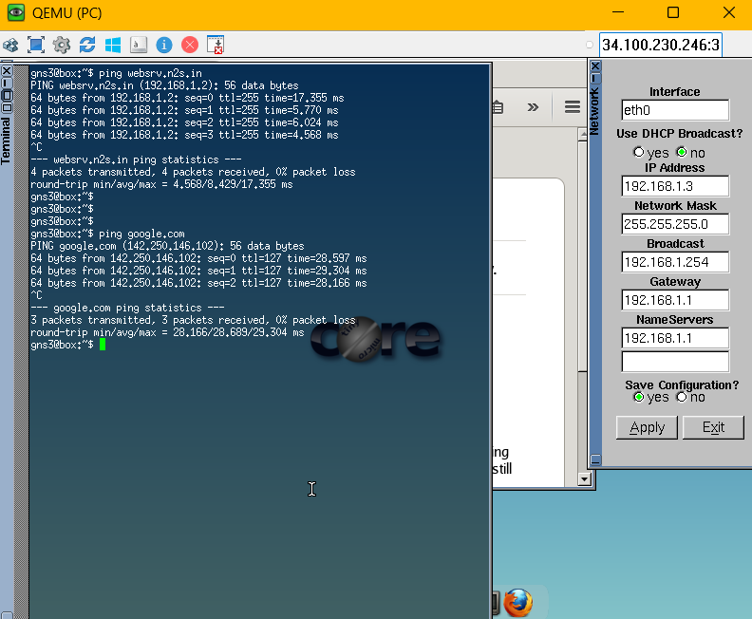
As you can see websrv.n2s.in is being resolved to 192.168.1.1 and google.com to its public IP. 6. HTTPS Web Server Configuration
The HTTPS web server runs on R-CA-CLIENT-WEB (192.168.1.2). It uses the CA-signed certificate enrolled in Section 4 so that browsers can validate the certificate chain back to the Root CA.
6.1 Enable the HTTPS Server
R-CA-CLIENT-WEB(config)# ip http secure-server
! Starts the TLS listener on TCP 443

R-CA-CLIENT-WEB(config)# ip http secure-trustpoint CA-SRV
! Binds the CA-SRV trustpoint certificate to the HTTPS server
! Without this, IOS uses a throwaway self-signed cert (untrusted by browsers)

R-CA-CLIENT-WEB(config)# ip http authentication local
! Use local username/password for HTTPS access

R-CA-CLIENT-WEB(config)# username admin privilege 15 secret Cisco123!
! Create an admin account (use 'secret' not 'password' — type-9 hash)

R-CA-CLIENT-WEB(config)# no ip http server
! Disable plain HTTP — force HTTPS only
| Command | Purpose |
| ip http secure-server | Enables the TLS (HTTPS) listener on TCP 443. |
| ip http secure-trustpoint <name> | Binds a PKI trustpoint's certificate to the HTTPS server — clients can validate the chain to the Root CA. |
| ip http authentication local | Authenticates users against the local username database (type the credentials in your browser). |
| no ip http server | Disables plain HTTP (TCP 80) — enforces HTTPS-only access. |
| username admin privilege 15 secret | Creates a local account. 'privilege 15' grants full access. Always use 'secret' (hashed) over 'password' (plaintext). |
R-CA-CLIENT-WEB# show ip http server secure status
HTTP secure server status:      Enabled
HTTP secure server port:        443
HTTP secure server ciphersuite: aes-128-cbc-sha dhe-aes-128-cbc-sha
                                ecdhe-rsa-aes-256-cbc-sha rsa-aes-cbc-sha2
                                rsa-aes-gcm-sha2 dhe-aes-gcm-sha2
                                ecdhe-rsa-aes-cbc-sha2 ecdhe-rsa-aes-gcm-sha2
HTTP secure server TLS version: TLSv1.2 TLSv1.1
HTTP secure server client authentication: Disabled
HTTP secure server trustpoint:  CA-SRV
HTTP secure server active session modules: ALL
💡 TLS Version Hardening (IOS-XE) On IOS-XE platforms you can restrict to TLS 1.2 only:
R-CA-CLIENT-WEB(config)# ip http tls-version TLSv1.2
TLS 1.0 and 1.1 are deprecated (RFC 8996) and should be disabled in production.
The ciphersuite list can also be restricted using: ip http secure-ciphersuite <list>
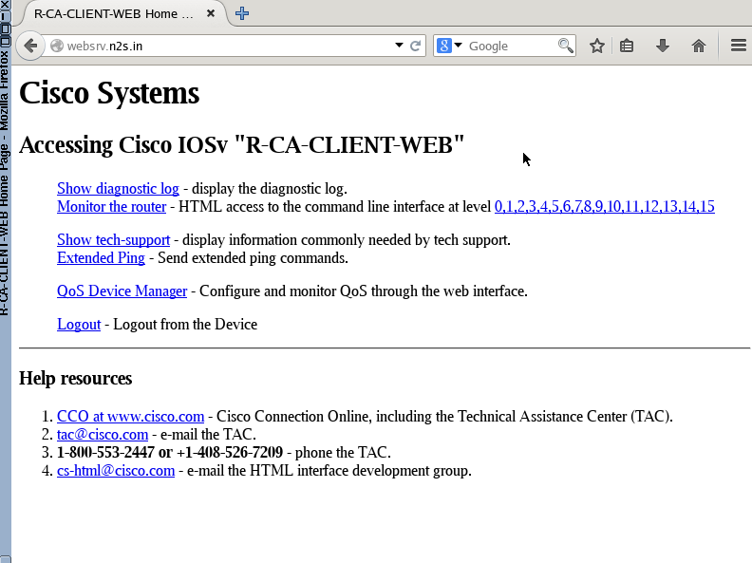
7.3 Browse to websrv.n2s.in Open a browser on the PC and navigate to https://websrv.n2s.in. The expected result:
● DNS resolves websrv.n2s.in → 192.168.1.2 via the IOS DNS server.
● TCP/443 connection is established to R-CA-CLIENT-WEB.
● TLS handshake succeeds — certificate chain validates to N2S-CA Root.