This guide will be divided into three sections:
Part 1: Cisco ISE Configuration
Part 2: Switch Configuration for MAB
Part 3: Endpoint Configuration and Verification Process
Part 1: Cisco ISE Configuration
Step1: Enable Process Host Lookup
Navigate to Work Centers>Network Access>Results>Allowed Protocols
and select the “Default Network Access”
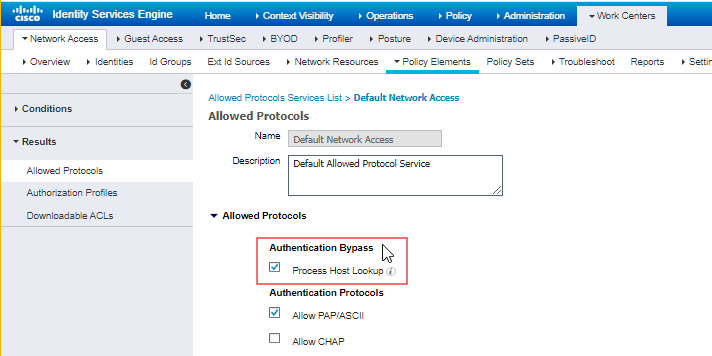 Select the Process Host Lookup in Authentication Bypass.
*Understanding the Process Host Lookup Feature in Cisco ISE
When Process Host Lookup is disabled: The MAC address is used as both the username and password, and it is checked against the Internal User Database.
When Process Host Lookup is enabled: The MAC address (Calling Station ID) is checked against the Internal Endpoints Database for authentication.
Step 2: Add your network device in the ISE.
This step is quite simple, navigate to Work Centers>Network Resources

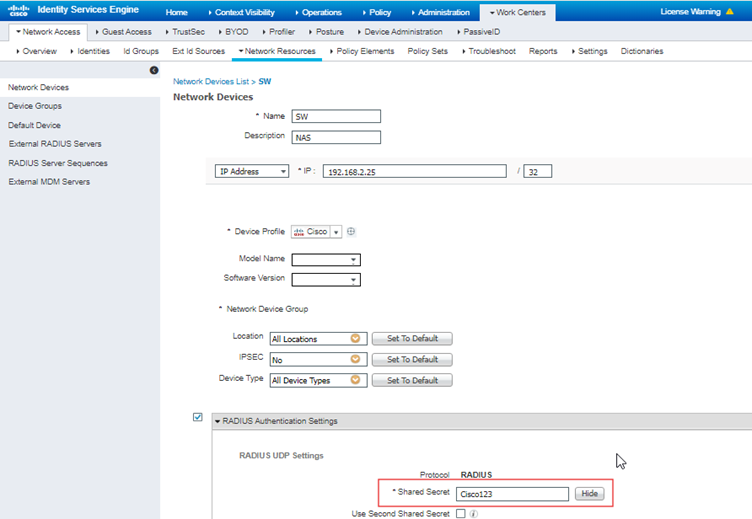 Fill in the required details and click RADIUS Authentication Settings and remember the Shared Secret key as it will be used while configuring RADIUS server in the Switch.
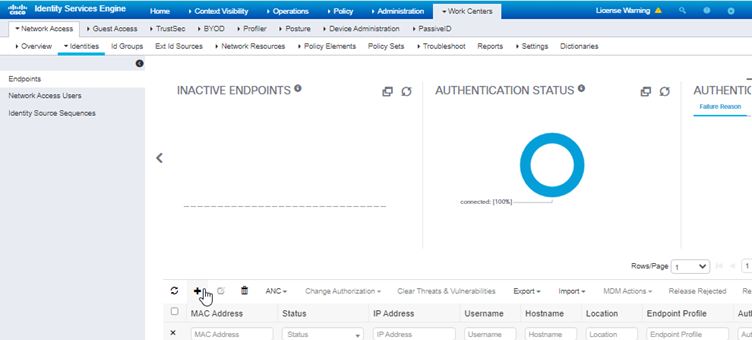
Step 3: Add your endpoint's MAC address to the Endpoint Database.
This step is optional because there are two ways to authenticate a MAC address:
1. Manually adding the MAC in Identities > Endpoints.
2. Using default Profiling, which auto-adds the MAC to the database.
In method 1, authentication succeeds on the first attempt. In method 2, the first attempt denies access as the MAC isn't in the database, but Profiling creates the profile, allowing authentication on the second attempt.
To manually add the MAC Address Navigate to Work Centers>Identities>Endpoints>Add (+) sign
 Step 4: Creating Policy Sets.
We will use the simple default policy as I want to keep this guide as simple as possible.
In Allowed Protocols/Server Sequence keep the Default Network Access.
 Now click the View(>) and go in the Authentication Policy.
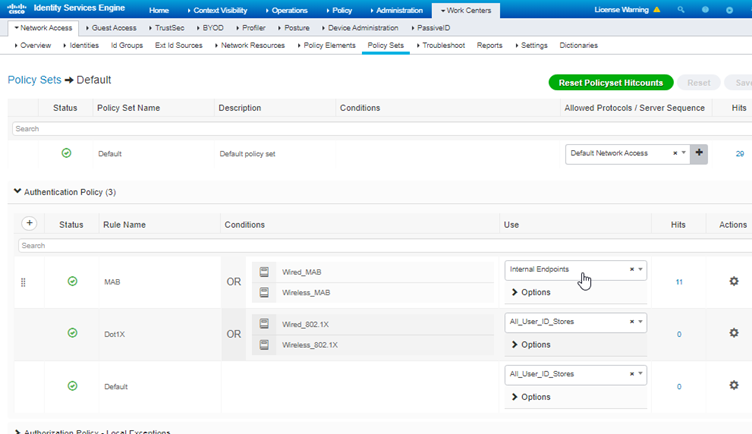
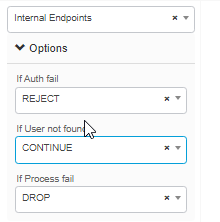 Select Internet Endpoint and in Option select Continue in If User not found. Rest we will keep the Authorization policy default.
Here we complete Part 1 that is ISE configuration.
Part 2: Cisco IOS Switch Configuration.
Step 1: Configure AAA Commands on the switch
Switch# show running-config aaa
aaa authentication dot1x default group radius
aaa authorization network default group radius
aaa accounting network default start-stop group radius
aaa accounting dot1x default start-stop group radius
radius server ise
address ipv4 192.168.2.10 auth-port 1812 acct-port 1813
key Cisco123
radius-server attribute 6 on-for-login-auth
radius-server attribute 8 include-in-access-req
radius-server attribute 25 access-request include
aaa group server radius ISE
server name ise
aaa new-model
aaa session-id common
Step 2: Interface Configuration
Configure the interface where the endpoint will be connected for MAC Authentication.
Switch(config)#interface gigabitEthernet 1/0
Switch(config-if)#switchport mode access // Port must be a access port or authentication commands would not be allowed
Switch(config-if)#authentication port-control auto //sets port state to automatic mode of authorization
Switch(config-if)#authentication host-mode multi-auth // Each device on the port must authenticate individually, allowing different access policies for each connected device.
Switch(config-if)#mab //enables MAC address Authentication
Here completes the Part 2 that is switch configuration. I have used the default AAA commands to keep it as simple as possible.
Part 3: Endpoint Configuration and Verification Process
Step 1: Start Wired AutoConfig
Run services.msc as a admin and go to Wired Autoconfig and start it.
 Step 2: Restart Network Adapter
Disable and Enable your network driver by going into network connections.
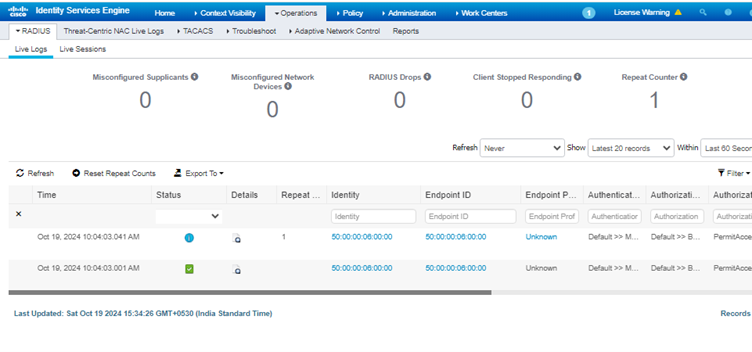
Step 3: Verification on ISE
Navigate to Operations>RADIUS>Live Logs
 Step 4: Verify Authentication sessions on Switch
